If you’ve ever nearly tripped down your deck stairs after dark, you know that feeling—heart in your throat, guest watching, and then mumbling something about “just needing a flashlight.” That’s exactly what happened to my neighbor, Mike, last October. He and his wife had just spent a small fortune on a new deck off their Greenwood kitchen, perfect for grilling and watching the kids play. But by 7 p.m. in late fall, the yard was pitch black. One misstep on the stairs, and he was already googling “deck lighting ideas Greenwood Indiana” the next morning.
Mike isn’t alone. Homeowners around Indianapolis—from Fishers to Zionsville, Carmel to Brownsburg—are realizing that a deck without good lighting is only half finished. It’s not just about looks, either. When you can’t see where you’re stepping, your guests can’t either. And that’s a lawsuit waiting to happen, not just an inconvenience.
So let’s talk about what actually works for Greenwood backyards, where we get freeze-thaw cycles, neighborly HOA eyes, and those dark winter evenings when you just want to take the trash out without breaking an ankle.
Build layers, not just one bright spot
Ever walk onto a deck lit by a single floodlight? It’s like sitting under a security lamp at a truck stop. The trick—and it’s one we stress at DeckPros—is layering light the same way you’d layer indoors.
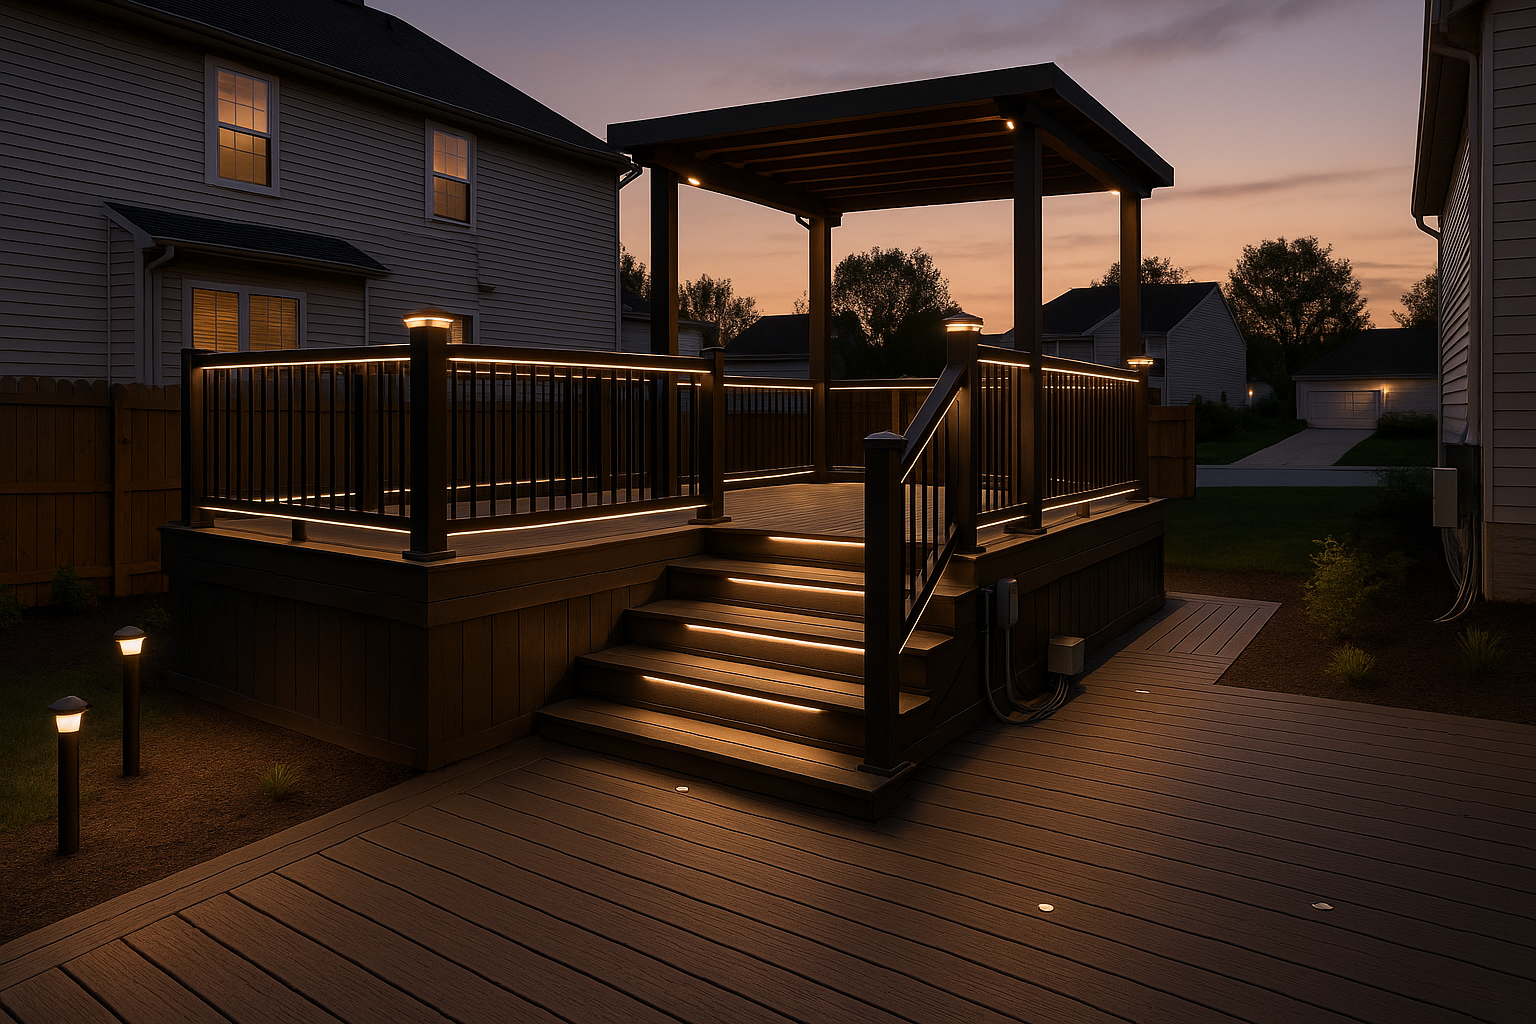
Start with the basics: post-cap lights on your railings. Those little mushroom-shaped fixtures that sit on top of your posts? They don’t just look pretty; they give a soft halo that marks the edge of the deck without shining in your eyes. Pair those with under-rail lighting—a continuous strip or puck lights tucked beneath the top rail—and you get a gentle wash on the floor without seeing the bulbs. That’s what makes the deck feel more like a room and less like a dark platform.
Then think stairs. Every single step needs its own light, whether it’s a recessed light in the riser, a tiny strip tucked under the tread nose, or a path light at the base. One unlit step is all it takes for a twisted ankle. And once you’ve got the stairs safe, extend that light out into the yard. A few path lights or bollards along a walkway does wonders, especially if you’ve got a fence line. Speaking of fences—if you’ve recently worked with a fence contractor to put up a perimeter, have them leave a little conduit or extra post space to run low-voltage wire. It keeps everything tidy when you add lighting later. Even a simple post light on a corner of a privacy fence can tie the whole yard together.
If you really want to take it up a notch, overhead lighting from a pergola or covered patio enclosure is pure gold. We’ve put hidden downlights inside pergola beams in Noblesville and Zionsville, creating pools of warm light exactly where people gather. Those string lights you see at breweries? They work, but hardwired LED spots with a dimmer are way more reliable through a summer storm. And if you’re still in the planning phase for a bigger outdoor structure, a patio enclosure supplier can coordinate the electrical rough-in before the roof goes up—trust me, it saves a ton of retrofitting headache.
Pick a glow that neighbors won’t hate
Greenwood neighborhoods skew toward quiet evenings. Nobody wants a deck glowing like a used-car lot. The color temperature you pick is the single biggest thing you can control to keep the peace.
Forget anything above 4000K—that harsh bluish-white screams “gas station.” Stick with 2700K to 3000K, which feels cozy and warm, like a campfire without the smoke. It’s flattering to skin tones (important when you’re hosting), doesn’t attract quite as many bugs, and blends with the amber porch lights most folks already have. In fact, a lot of HOAs around Center Grove and Northern Johnson County actually prefer 2700K for exterior fixtures on paper.
Beyond color, direction matters. Fixtures with good shielding and dark-sky-friendly designs aim light down where you need it, not up into the trees or across the fence into your neighbor’s bedroom. An under-rail light with a glare shield is a small detail, but it makes a huge difference when you’re sitting on the deck looking toward the tree line instead of squinting into a diode. We’ve swapped out post caps for homeowners in Carmel and Fishers who got complaints—they just picked ones with a sealed top and louvered sides, and the complaints stopped overnight.
Make it last through Greenwood weather
Indiana weather chews up cheap fixtures. You might get one season out of those solar stakes from the big box store, but by February, they’re dim, yellowed, and half buried in mud. Here, you want IP65-rated wet-location fixtures at a minimum. That means they’re sealed against rain, snow, and the sideways sleet that seems to find every crack.
Materials matter. Powder-coated aluminum bodies and stainless-steel screws hold up to the freeze-thaw cycle better than plastic, which gets brittle and snaps. UV-stable lenses won’t fog or turn chalky after a couple of summers. And think about where the snow piles up—a post-cap light that sticks up like a little fin will get whacked by a shovel. Low-profile pucks or lights recessed into the deck surface or stairs are practically invisible to clean-up and won’t get caught on a boot.
In the dead of winter, when the sun dips at 5:30, having path lights from the garage to the deck is a quality-of-life thing. It’s not just about party vibes; it’s about coming home from work without trekking through a frozen mud puddle you couldn’t see.
Keep the power simple and safe
Solar lights sound tempting—no wires, just stick ’em anywhere. But around here, winter sun is weak, and tree cover in backyards like Plainfield or Brownsburg shades them even more. You’ll end up with a disappointing half-glow right when you need it most. Low-voltage (12V) wired systems are what I’d recommend for any deck bigger than a postage stamp.
Here’s the quick anatomy: a transformer plugged into a GFCI-protected outdoor outlet steps down household current to a safe 12 volts. That tiny current won’t hurt anyone, so you can run the wires just under mulch or buried a few inches without conduit. Size the transformer to about 70–80% of its max load so you’ve got room to add a couple more fixtures later—because you will. For a medium Greenwood deck with stairs and a path, a 150–200 watt transformer usually covers it.
Smart controls are easier than ever. A photocell turns everything on at dusk and off at dawn, and a simple timer adds flexibility. If you go the smart route, look for Wi-Fi controllers rated for outdoor use and put the module inside a weatherproof box near the outlet. Then you can dim everything from your phone. Having a dimming zone for the stairs, one for the seating area, and one for paths means you’re not lighting up the whole block just to let the dog out.
If any new outdoor outlets or circuits are needed, this is where a licensed contractor comes in. Yes, it adds a line item, but an outdoor GFCI wired correctly is one less thing to worry about when spring thunder-bumpers roll through. We coordinate that part so you don’t have to play middleman.
Sneak wires so they disappear
Wires are the enemy of a clean look. On a new composite deck—we’re talking about the stuff from TimberTech or Trex you see all over Johnson County—you can plan wire channels before the boards go down. That means the low-voltage cable runs inside the aluminum railing posts or through dedicated troughs under the deck, and all you see are the fixtures themselves. If you’re weighing composite vs wood deck options, the wire-routing flexibility is a legit point in favor of composites.
For existing decks, it’s still doable. Surface-mount wire tracks painted to match the railings blend in if you’re careful. Under-rail strips often have a channel for the wire anyway. On the stairs, cable can be fished up behind the riser or run under the tread overhang. The goal is zero visible zip ties and no wires draped over metal brackets. It’s a small thing, but when your father-in-law visits and doesn’t notice the lighting until it’s on, you’ve nailed it.
Don’t forget safety (and the code stuff)
Even lighting falls under the International Residential Code when it's hardwired. In most Greenwood neighborhoods, low-voltage systems don’t need a separate electrical permit, but any new outlets or circuits do. HOA rules are another layer. Some newer subdivisions in the Center Grove area have architectural guidelines about light spill, fixture style, and color temperature. It’s worth checking before you buy—but honestly, if you stick with warm, shielded fixtures, you’ll clear most HOA approvals without a fuss. (We can show examples of setups that have sailed through, no drama.)
A good rule of thumb from the permit side of things: if you’re altering the structure to run wires, or adding a new outdoor receptacle, a call to Johnson County planning or your HOA management company is a smart afternoon project. DeckPros handles that back-and-forth so you don’t get a red tag.
Small details that make a big difference
A handful of choices separate a so-so lighting set-up from one that makes you want to stay outside until midnight.
- Matching finishes: If your railings are black aluminum, silver post caps will look like an afterthought. We match fixture housing to the railing color and grain, down to the satin or matte tone.
- CRI 90+: Color Rendering Index over 90 means your steak on the grill looks like actual meat, not a gray slab. Worth it for cooking areas.
- Dimming zones: Already touched on, but a dimmer for the dining table and another for the path is the difference between “mood” and “runway.”
- Consistent color temp: Mixing a warm 2700K post cap with a cool 4000K step light gives a jarring, mismatched look. Pick one temperature and stick with it across every fixture.
When we’re drawing up a plan for a multi-level deck—something like those tiered designs we see in Zionsville—we’ll separate zones per level so the upper deck can be bright for dining while the lower conversation pit stays a softer glow.
Quick budget realities
We don’t do vague pricing. A basic professional package that covers stairs, posts, and a transformer for a 12x16 deck runs a few grand. A mid-range plan with under-rail soft wash, path lights, and smart dimming adds maybe half again. A full-on luxury install with pergola downlights, multi-zone control, and custom-fabricated mounting is whatever you want it to be. We break down the materials and labor so you know where every dollar goes.
One thing to avoid: those $20 solar path lights from the hardware store. They’ll be dead by March, and then you’re back here reading this article again. Put the money into a wired system once.
Keep it working year after year
Maintenance is minimal if you start right. Every spring, take a damp cloth to the lenses—pollen and dirt cut output. After a big storm, check that path lights haven’t tilted out of aim. In fall, make sure wire connections at the transformer are still tight. LED bulbs themselves can run for a decade or more, so chances are the only thing you’ll replace is a photocell or a chewed wire (squirrels, seriously).
If you ever add a pergola or covered enclosure later, the transformer usually has capacity to expand. It’s just a matter of pulling new cable through existing tracks.
If you’re staring at your dark deck right now and thinking about how much more you’d use the space with a little light, let’s talk. We’ll come out, walk your yard with you, and sketch a plan that fits your budget and your neighborhood. No hard sell, no blinding floodlights. Just a custom layout that works from the first snow to the last bug of summer. Grab a time through our quote page and we’ll get it sorted.
Thinking about your own deck or pergola?
Free in-home design consultation, 3D rendering, and a written quote — no pressure.


